I just don't understand why they would. They mentioned pixel formats clearly specific to HDR workflows, based on what I quoted from post 78 above. Why would they mention that but then shut down any questions about that? If they just wanted their own exporters to use those formats, I wouldn't think they would be mentioned at all.
Beiträge von morphinapg
-
-

Seems my post just got deleted. Alright, that's a way to deal with questions, too.
Try sending a message to the guy who replied before maybe?
-
Alles anzeigen
I have to ask Adobe about this as the HDR workflow is not documented in their SDK.
But from what i know is important is ...
- In Premiere Pro):
- You select 10 bit color depth, so Voukoder Pro gets 10 bit data
- In Voukoder Pro
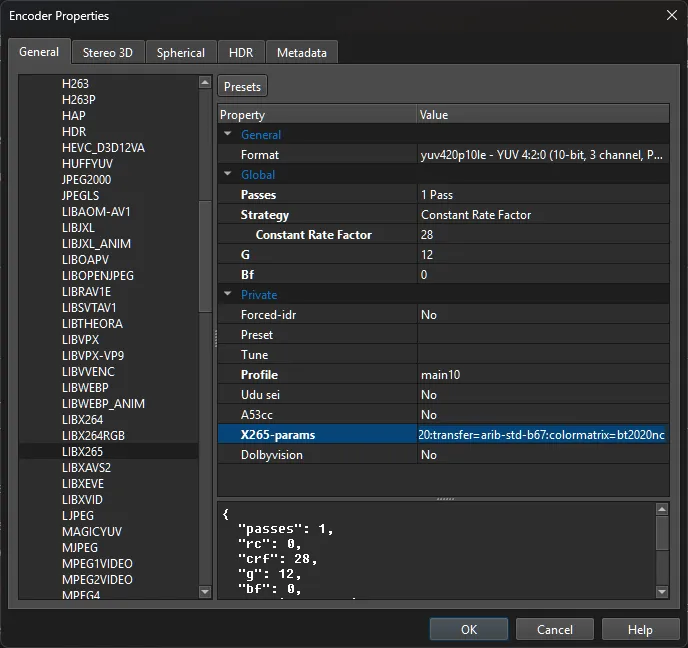
- The only difference between Rec.709 (SDR) and Rec.2100 (HDR) is the VUI / SEI Meta-Data (not sure, really?) so if I enter this data manually in the x265-params: colorprim=bt2020:transfer=arib-std-b67:colormatrix=bt2020nc
I get a MediaInfo like this:
Color primaries : BT.709
colour_primaries_Original : BT.2020
Transfer characteristics : BT.709
transfer_characteristics_Origi : HLG
Matrix coefficients : BT.709
matrix_coefficients_Original : BT.2020 non-constant
The VUIs look correct:
The normal values are for non-HDR playback deviced.
The _Original values for HDR playback devices.
But I didn't test the file yet.
- The only difference between Rec.709 (SDR) and Rec.2100 (HDR) is the VUI / SEI Meta-Data (not sure, really?) so if I enter this data manually in the x265-params: colorprim=bt2020:transfer=arib-std-b67:colormatrix=bt2020nc
You can also try to right click on your sequence and say ...
Modify > Color ...
and select this:
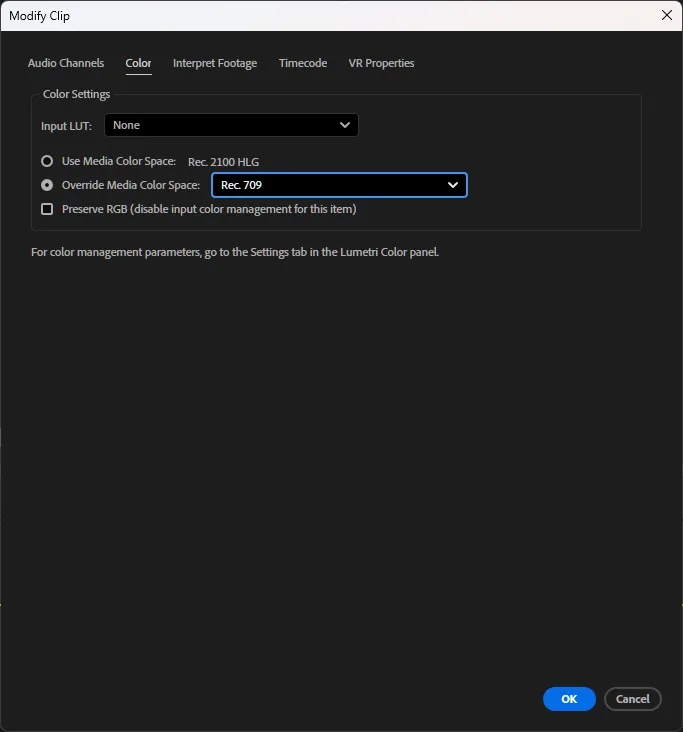
Maybe that was what morphinapg meant ... but I know he has the most insight regarding this topic here. So please correct me if i am wrong.
P.S.: My post in Adobes forum: https://community.adobe.com/t5/coding-corn…/15659271#M2092
Premiere has built in color management, so if the output mode is not rec2100, it will automatically tonemap to rec709. So even if you flag it as HDR in your voukoder settings and it will look correct in mediainfo, it will look VERY wrong on screen. You will be taking a SDR image and interpreting it as HDR. The colorspace and brightness will be mapped to incredibly wrong values when you do this.
I currently have to tell premiere to interpret my HDR footage as rec709, and also do the same for the timeline, so that Premiere doesn't apply its color management, and then the values being sent to voukoder are the correct rec2100 (bt2020 / st2084) values, meaning adding that metadata will allow colors and luminance to be displayed correctly on an HDR display.
However, there IS supposed to be a native HDR export mode. The built in exporters have this option:
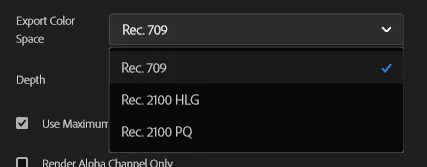
Which I would hope would be reproducible in the Premiere connector, but I personally haven't looked into the SDK about it. However, I do believe you mentioned the SDK having likely compatible output modes here:
Alles anzeigenJust noticed adobe released the 2022 SDK with a bunch of new pixel formats:
PrPixelFormat_YUV_420_MPEG4_FIELD_PICTURE_BIPLANAR_10u_as16u_709 = MAKE_PIXEL_FORMAT_FOURCC('p', '0', 'i', '0'),PrPixelFormat_YUV_420_MPEG4_FRAME_PICTURE_BIPLANAR_10u_as16u_709 = MAKE_PIXEL_FORMAT_FOURCC('p', '0', '1', '0'),
PrPixelFormat_YUV_420_MPEG4_FIELD_PICTURE_BIPLANAR_10u_as16u_709_FullRange = MAKE_PIXEL_FORMAT_FOURCC('p', '0', 'i', 'f'),
PrPixelFormat_YUV_420_MPEG4_FRAME_PICTURE_BIPLANAR_10u_as16u_709_FullRange = MAKE_PIXEL_FORMAT_FOURCC('p', '0', '1', 'f'),
PrPixelFormat_YUV_420_MPEG4_FIELD_PICTURE_BIPLANAR_10u_as16u_2020 = MAKE_PIXEL_FORMAT_FOURCC('P', '0', 'i', '0'),
PrPixelFormat_YUV_420_MPEG4_FRAME_PICTURE_BIPLANAR_10u_as16u_2020 = MAKE_PIXEL_FORMAT_FOURCC('P', '0', '1', '0'),
PrPixelFormat_YUV_420_MPEG4_FIELD_PICTURE_BIPLANAR_10u_as16u_2020_FullRange = MAKE_PIXEL_FORMAT_FOURCC('P', '0', 'i', 'f'),
PrPixelFormat_YUV_420_MPEG4_FRAME_PICTURE_BIPLANAR_10u_as16u_2020_FullRange = MAKE_PIXEL_FORMAT_FOURCC('P', '0', '1', 'f'),
PrPixelFormat_YUV_420_MPEG4_FIELD_PICTURE_BIPLANAR_10u_as16u_2020_HDR = MAKE_PIXEL_FORMAT_FOURCC('P', 'O', 'i', '0'),
PrPixelFormat_YUV_420_MPEG4_FRAME_PICTURE_BIPLANAR_10u_as16u_2020_HDR = MAKE_PIXEL_FORMAT_FOURCC('P', 'O', '1', '0'),
PrPixelFormat_YUV_420_MPEG4_FIELD_PICTURE_BIPLANAR_10u_as16u_2020_HDR_FullRange = MAKE_PIXEL_FORMAT_FOURCC('P', 'O', 'i', 'f'),
PrPixelFormat_YUV_420_MPEG4_FRAME_PICTURE_BIPLANAR_10u_as16u_2020_HDR_FullRange = MAKE_PIXEL_FORMAT_FOURCC('P', 'O', '1', 'f'),
PrPixelFormat_YUV_420_MPEG4_FIELD_PICTURE_BIPLANAR_10u_as16u_2020_HDR_HLG = MAKE_PIXEL_FORMAT_FOURCC('P', 'h', 'l', '0'),
PrPixelFormat_YUV_420_MPEG4_FRAME_PICTURE_BIPLANAR_10u_as16u_2020_HDR_HLG = MAKE_PIXEL_FORMAT_FOURCC('P', 'H', 'L', '0'),
PrPixelFormat_YUV_420_MPEG4_FIELD_PICTURE_BIPLANAR_10u_as16u_2020_HDR_HLG_FullRange = MAKE_PIXEL_FORMAT_FOURCC('P', 'h', 'l', 'f'),
PrPixelFormat_YUV_420_MPEG4_FRAME_PICTURE_BIPLANAR_10u_as16u_2020_HDR_HLG_FullRange = MAKE_PIXEL_FORMAT_FOURCC('P', 'H', 'L', 'f'),
Although the renderer returned an error when I tried to use the HLG format.
- In Premiere Pro):
-

Hi, can somebody please help me with correctly processing HDR with Voukoder and Premier Pro 2025? I'm trying to set up Voukoder to convert my entire library to AV1, but HDR is giving me headaches. I tried changing all kinds of settings (Matrix/Primaries/Transfer in Voukoder's Video Input, Output Color Space in Sequence Settings, Override Media Color Space in Interpret Footage, etc.), but no matter what I do, the end result is always slightly brighter than the original:
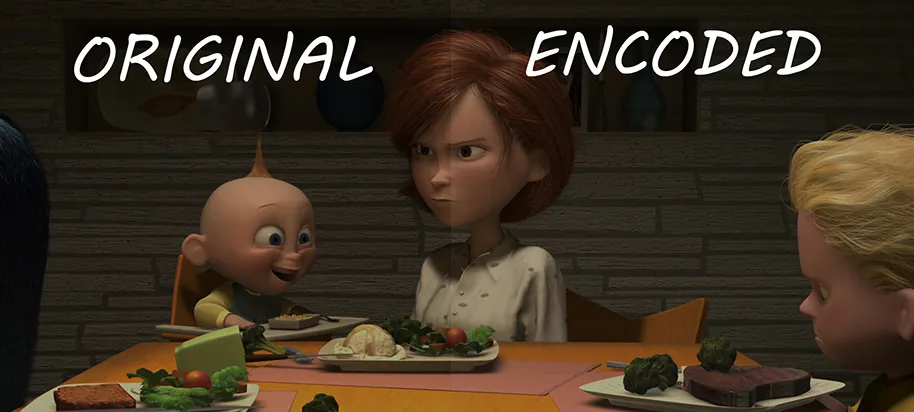
Here's a short sample of The Incredibles I've been trying to convert:
And here are the relevant svtav1-params (I removed the rest to make sure it wasn't something else):
Any idea what settings I should use to correct this? I'm largely a newb when it comes to encoding HDR, so my hope is that it's something very simple.
Unless things have changed with the new version, I believe Voukoder still doesn't support Premiere's native HDR implementation, so what you need to do is interpret your source videos as rec709, and also make sure your timelines are set to rec709 so that no color conversions are happening, before you send them to voukoder. Otherwise premiere will apply an HDR-to-SDR tonemapping and colorspace conversion before encoding happens, and the encode will happen with the wrong RGB values.
I've you've done all that and are still having problems, I would recommend making a new timeline from your footage, and then copying your edits from the other timeline into it. I had an issue with newer versions of premiere where shots I was rendering for VFX work were coming out slightly higher despite the footage and timeline being set to rec709 before encoding, but copying my edits to a new timeline that was rec709 from the start solved that for me.
-
HDR should have a lower CRF than SDR (at least 4 less in my testing), but I don't think resolution or frame rate should affect CRF much if at all.
And I don't agree that you can have a higher CRF in x265 vs x264. I would say you actually need to go lower to match x264 quality. I don't think HEVC is quite as effective at compression as people like to claim. When I do side by side comparisons, I wouldn't go any higher than the same value I use for x264.
I tend to use CRF 18 for SDR and 14 for HDR. H265 is absolutely not visually lossless at CRF 22. I see very visible artifacting at lower settings than that.
-
Voted Premiere but I'm considering switching to Resolve in the future if they can get all of the features I need. Primarily, I need an HDR preview in Windows, but also, their replacement for After Effects' Content Aware Fill doesn't appear to handle more difficult scenarios as well as AE does. If they end up doing both things as good or better than Premiere/AE in the future, I may be able to finally switch and downgrade my Adobe subscription to Photoshop only.
-

You need video filters or we can't change the resolution or framerate from what the project is.
I'm not sure about other editors, but the premiere export tab allows you to do exactly that
-
-

After grabbing this log I also just tested it by encoding with video + truehd and got the same issue
By the way, when I tested that, I wanted to send a very low resolution so that video wouldn't use much resources, and I noticed that if I went to type a custom resolution in premiere, premiere would return weird random numbers, like an overflow error or something. Worked fine in other encoders, and choosing a custom resolution in media encoder worked fine too. Adobe probably screwed something up with their ugly new export screen in Premiere.
-
Did you ever figure out what caused this? I just tried TrueHD export again with my current project and had the same crash.
-
Yeah, Premiere's encoders annoyed me with that too now that you mention it lol
Found the spec that defines these values:
mastering-display-color-volume-metadata-supporting-high-luminanc.pdfHere's the relevant part:
Zitat5.6 Maximum Display Mastering Luminance The nominal maximum display luminance of the mastering display, as configured for the mastering process, shall be represented in candelas per square meter (cd/m2). The value shall be a multiple of 1 candela per square meter.
A value in the range [5, 10000] shall indicate the nominal maximum display luminance.
5.7 Minimum Display Mastering Luminance The nominal minimum display luminance of the mastering display, as configured for the mastering process, shall be represented in candelas per square meter (cd/m2). The value shall be a multiple of 0.0001 candelas per square meter.
A value in the range [0.0001, 5.0000] shall indicate the nominal minimum display luminance.
Personally, I would allow a MinMDL of 0. The paper does say out of scope values can be used, and gives some examples.
So I would say 5-10000 for Maximum, and 0.0000-5.0000 for minimum are reasonable values that I wouldn't expect anybody to want to go outside of. Honestly I wouldn't expect anybody to go below 100 for maximum either, but it's allowed in the spec so it might as well be allowed in the settings here.
Although technically, for out of scope reasons you could just allow 0-10000 for both, and maybe just note the nominal range in the tool tip.
-
I've been doing some tests, considering the possibility of moving to NVENC for the projects I previously reserved for x265, since I was assuming that x265 had better compressibility at the same file sizes, even though it was slower due to it being on the CPU, but some tests I've been doing seem to suggest that may not necessarily be true, but I need to do more tests to confirm that.
Anyway, one of these tests would involve HDR content, and in order to do that I am using setparams to set color space values. For my tests that's enough for now, but if I ended up using this workflow for my full projects, I'd need to make use of the "Mastering Display" and "Content Light Level" sections of the Side Data tab, as NVENC doesn't have its own sections for those settings like x265 does.
However, I noticed Maximum Luminance was limited to 4000 nits. While I of course do not have a display greater than 4000 nits, much of what I work with is video game content which can regularly exceed that. The problem is, if MaxMDL is considerably lower than the MaxCLL, many TVs will assume anything above MaxMDL should be clipped, and so it will use tonemapping curves that aren't the most optimal for the content. The HDR10 spec allows for content up to the 10,000 nit level, and MaxMDL should be allowed to be set that high as well.
Similarly, MinMDL seems to have a minimum of 0.001, whereas I am using an OLED that has absolute perfect blacks, so I'd prefer to set this to exactly 0, since most of my content does indeed make use of perfect blacks.
So are these limitations put in place by something in ffmpeg, or were these just values you placed here based on some other information perhaps? If these could be expanded to allow the full range of 0 through 10,000, that would probably be better. Min Luminance doesn't need to go that high of course, but if you have a screen with a 1000:1 native contrast ratio and 1000 nits, then its minimum black level would be 1 nit, which isn't unrealistic, so I'd probably place the upper limit for that maybe at 5. Although I don't think many TVs actually do anything with the MinMDL setting, but it would just be better to have a wider range of possible values if possible.
-
Yeah, it seems that I would have been using Voukoder 10.2 and probably Premiere Pro 22.1.1 when I last did this.
I just tested with Dolby Digital, audio only export and that was working fine. Tried multichannel PCM output too, and that seemed to work as well.
-
I'm assuming it's something Premiere did with a recent update, because I was able to do this as recently as January, but with the current version of these apps (22.4) it crashes as soon as it begins the encode.
-

Thank you very much for coming back to me so quickly and completely understand regarding the guide/thread not being for this sort of thing but was also just curious as to whether Voukoder may suit some of my needs.
Please find link to the MediaInfo. I tried quite a few different combinations but so far still no luck with YouTube tagging them correctly.
https://drive.google.com/drive/folders/…tvW?usp=sharing
I will definitely look at AviDemux for trimming purposes. To be honest, ideally I didn't want to trim and re-encode the file through Premiere Pro but tried it as my original HDR capture that I uploaded to YouTube kept exhibiting frame drops at certain points in the clip that were not present when playing on any of my internal media players, but were only present once YouTube had finished converting.
I did have it happen to one of my other HDR clips at certain points but when I re-encoded from H.265 to H.264 and re-uploaded to YouTube it fixed the stuttering/fps drops.
You're right. Youtube definitely should be recognizing those files as HDR. As far as I can tell, everything you've done here is right. If it's not working, that's a problem on their end and I would recommend contacting youtube support to get it fixed. I have had some issues getting files to be recognized in the past, and it seems youtube can sometimes be inconsistent on when this works and when it doesn't, but letting them know whenever it doesn't work correctly can help solve the problem. Make sure you wait a couple days after uploading though in case processing is just taking extra time.
-
Hi all,
I hope you are doing well?
Apologies for my lack of knowledge regarding some of these processes but had hoped that someone may be able to advise me on what I may be doing wrong.
Just to be clear this guide and thread are about encoding using the Voukoder plugin. I'm not too familiar with Adobe's built-in encoders, which have also changed considerably since I wrote this guide. If I had to guess, their youtube 4K preset is not designed for HDR, but I do know some of their other codec settings work fine. I just don't like them because I don't have access to the type of codecs and options I like, which Voukoder has, so I don't use them.
For HDR recording myself, I use the Atomos Ninja Inferno (newer version is called Ninja V), which allows me to manually flag the footage as SDR if I want, or leave it as the default HDR tags to use with the preset I uploaded in the first post. In the future, the premiere connector for Voukoder will also be able to work with the native HDR support Premiere has now, which will make much of my guide obsolete. As for other ways to record HDR, I believe ShadowPlay has some kind of HDR capture support, and the PS5's built-in game capture does capture HDR as well, although it's pretty heavily compressed. There may be other ways to record HDR as well that I'm unfamiliar with.
As for why the image looks less crisp to you when converted to SDR, there could be two things going on. Either your HDR display modes are adding sharpening to them, which the display would then lack in SDR, or you're simply noticing the difference in dynamic range. Higher dynamic range means a larger contrast between dark and light colors, and higher contrast edges will inevitably look sharper because of this. When you compress that dynamic range down, you are lowering the contrast of the image, and those edges with it. This can be especially bad if the tonemapping being applied is not ideal for the footage you recorded, which is why it will look different than if you just captured it directly in SDR, like you said, since the game will tonemap its visuals much more ideally to the SDR range than any automatic tonemapping solution would do. This is why youtube allows for attaching a LUT to HDR footage, which you would generate by using color grading software, such as either lumetri color in premiere, or da vinci resolve for example. This would allow you to color grade and tonemap the image entirely yourself, giving you full control over the way shadows, midtones, and highlights look, the way color looks, the way the contrast of the image is handled, etc.
ZitatWhat I have recently noticed though is that If I have imported one of the raw captures from the Gamer Bolt into Premiere Pro and then used the razor tool to trim it, no matter what I do in terms of export settings, YouTube will not flag it as HDR even though in Media Info it appears that all of the information is correct and virtually identical to the original file.
Would you mind posting the mediainfo on such a file? If combining two videos together worked for you, trimming it shouldn't work any differently. Although note there are apps you can use to do both of these things without needing to re-encode, if you don't want to waste extra time or potentially add more compression to the image. The one I like to use for simple trims and appends is called AviDemux. Doing that will ensure the bitstream of the original is maintained 100%, without any modifications an additional encoder could do.
-
Well, you'd need to use side data to set CLL and Master Display values (HDR10).
Once I have some time I'll work on a new premiere connector as this requries the 2022 SDK.
True, I meant to specify that it eliminates the need to set color space in those things.
That being said, it's still nice to have those options if anybody needs a specific need to change the color space details without a conversion taking place. It's not always guaranteed that source footage will be correctly set up or interpreted correctly.
-
Okay that makes sense. If this works it would effectively eliminate the need to use my Lumetri preset (or like I do, record the footage incorrectly flagged as rec709) and would also eliminate the need to either use setparams, side data, or set the color space info directly in the encoder as well. It would save a lot of work for sure!
The only remaining thing would be setting the Max/Min MDL and MaxCLL/FALL metadata. You can get away with not setting it, but content will usually look better if that metadata is set correctly.
Of course I've already started a project using my old method lol, and premiere won't let me re-interpret the color space of my footage, so I'll have to wait until my next project to be able to make use of it for my own work, although I could probably do some quick tests.
-
That's a little hard to decipher. Normally I would associate fields with interlace, but I'm pretty sure UHD doesn't have any interlace formats so I'm not sure why those are there unless they refer to something else, and I don't know what biplanar means either. If you don't have any other information about these formats, I'd probably assume the ones that say FRAME and don't say FullRange are probably the best choices.
So what I'd probably do is, in the color space drop down in the connector, add:
ITU-R BT2020 (HDR PQ) - PrPixelFormat_YUV_420_MPEG4_FRAME_PICTURE_BIPLANAR_10u_as16u_2020_HDR
ITU-R BT2020 (HDR HLG) - PrPixelFormat_YUV_420_MPEG4_FRAME_PICTURE_BIPLANAR_10u_as16u_2020_HDR_HLG
-
From what I've read these formats only work with effects, not with output plugins.
Oh, that's disappointing if true
