Beiträge von morphinapg

    Thank you very much for the patch, indeed i don't know if it works inside adobe premiere because after a clean installation the output of the enoding is good. I mean by that with the false flag and without it, the result is the same after x265 Voukoder but i don't know internally if it works.

    Very strange, even the colors are the same? Perhaps Premiere treats HLG differently.

    Do you have a simple solution to false the flag before editing ?

    Did that ffmpeg mod I linked earlier work for you? I've now created a filter preset in Premiere that can un-do Premiere's HDR-to-SDR processing that it performs on any file flagged as HDR. Ultimately, if you can un-flag it before using premiere, that would be best, but if you can't, go ahead and use my preset which I've linked on a new HDR encoding guide I wrote here:

    HDR Encoding Guide for Premiere Pro

    That post also includes a tool I created for correctly flagging the brightness of the source in HDR metadata as well, which would be really helpful even if you can import the footage raw like I do.

    UPDATE: With newer versions of Premiere Pro (I believe late 2021 onwards), you can skip some of this guide. Instead of using my preset, simply right click your HDR footage, select Interpret Footage, and change color space to rec709. Make sure your Sequence is also in Rec709. Everything else about this guide should still be useful. If Premiere doesn't let you select color space for that footage, then the preset may still be useful to you. According to Vouk, the successor to Voukoder will be able to make use of Premiere's native HDR formats, so even this won't be necessary, although if you plan to use the HDR Metadata tool I created to measure your screencaps, you may still wish to interpret as rec709 for that purpose.


    (Guide written using Voukoder 2.3 and Premiere Pro 2019)

    If anybody here is new to HDR encoding in premiere, it can be particularly tricky to get it right. Basically, Premiere is not designed for doing HDR editing properly. It can recognize HDR input files, and even has HDR color correction, but it has no way to visibly monitor the HDR output, and the only way to actually export using this process is through Adobe's own HEVC codec. If you want to display your video on an HDR monitor and/or export using x265, Premiere's default settings will prevent you from doing that correctly.

    If you feed Adobe Premiere an HDR file, it will read it as such and display it as SDR clipped at 100nits. Meaning all HDR highlight information is lost, and the timeline will not be in the correct picture format for exporting to HDR using x265. x265 expects to receive the raw video signal, unprocessed. HDR uses a different gamma function than SDR, called ST2084, and this results in a very washed out picture. Here is a sample of what a raw frame of HDR would look like in Premiere, if premiere had not performed a conversion for displaying it on SDR monitors:


    and here is how that same image appears when Premiere decides to apply its HDR-to-SDR conversion:

    Obviously overexposed, losing detail in the brightest parts and even some color volume. Here is an example of how that image may look with the exposure lowered to display all detail you would see on an HDR display (on the HDR display, it would be as bright as the above image, but with all highlight information retained)

    Obviously, there was a lot lost when Premiere did its conversion thing, but we can get it back. All of that detail is still there, it's just being clipped. So if I adjust the curves in Lumetri to map 0 nits to "black" and 10,000 nits to "white", this allows for the full HDR range to be represented in the black-to-white Premiere output range, however, it still is using the rec709 transfer function and colors. This needs to be fixed. The way I do that is apply a custom 3D LUT which contains all of the mathematical conversions to revert the transfer function to ST2084, and the colors to BT2020. This will result in the image in the program monitor to look the same as the first image above. This means we can now export to x265! This also means you can display the program monitor on an HDR capable display, in order to monitor the output in real time correctly.

    In order to do this, I've created a preset for Premiere that layers two Lumetri effects on top of each other and performs all of the necessary computations to revert everything to the correct color format for x265:

    Premiere 2019:

    Convert back to raw ST2084-BT2020.zip

    Premiere 2020:

    Convert back to raw ST2084-BT2020 (PP2020).zip

    Download this, and import the preset into premiere, and then apply it to any video you intent to export into HDR. If you've performed multiple edits, you can either create an adjustment layer and apply the preset to that, or create a new sequence where you import your edit sequence, and then just apply the preset to that track. Alternatively, if you can trick Premiere into thinking your footage is rec709, you don't need this step. My Atomos Ninja Inferno allows me to record HDR flagged as rec709, so I use that instead.

    In order to output HDR10 correctly, you will need metadata. I don't recommend simply just using x265's default settings for those as I know many people do. For one, it uses DCI-P3 primaries, so color will be wrong, and for another, it doesn't contain the correct brightness information, so TVs will not be able to tonemap this correctly to your display's capabilities.

    Fortunately, I've created a solution for this:

    HDR Metadata Tool.zip

    The way this app works is you feed it a folder full of image files containing the same raw unprocessed video image we created above. Even though you're dealing with HDR video, I could only get my program to work with 8bit PNG files, so make sure they aren't 16bit. The end result is only an approximation, but it's close.

    EDIT: The app works now with 16bit image sources, and not just PNG either. If exporting from premiere, I recommend 16bit TIFF files (no alpha is needed, but the app will ignore alpha if it is there) TIFF, PNG, JPG, and BMP are all supported at 8/16 bit with or without Alpha. Warning: If you use 16bit TIFFs, you may need to store them on an SSD or the app may lock up at times.

    What I recommend to do is watch through your entire video and export a screenshot for every unique shot in the video. Try to avoid choosing frames with quick, bright flashes, as while they may contain brighter pixels, the metadata is intending to describe your entire movie for the purpose of tonemapping, so you don't want the metadata to simply describe just those brighter frames. This I think is a major flaw in how hollywood calculates its metadata (looking at every single frame).

    What you want are the MaxCLL and MaxFALL numbers. MaxCLL represents the brightest pixel the app found, and MaxFALL represents the brightest frame average luminance (APL).

    Now you're ready to export to Voukoder. In the main window, Voukoder has a color space selection, leave this at the default Rec709 (HD) value. Even though this is incorrect, this is the format Premiere exports its timeline in, and modifying that will result in incorrect pixel colors, screwing up the whole process. Range should also be Limited, as this is the correct legal range for HDR10 output.

    Next, open the Voukoder configuration. Make sure the HEVC (x265) encoder is selected, and press configure. Color format needs to be 4:2:0 (10bit). For encoding quality, I recommend CRF13. That may seem low to you, but I've found due to the differing picture format, the CRF values are not equivalent to what you'd use in SDR. I use CRF18 in SDR, and found that CRF13 gave equivalent level of detail in SDR. So take whatever you might normally use, and reduce CRF by 5 for optimal results. Reducing by 4 also gave pretty close results visually, but gave me a file size smaller than the SDR, so I went with -5 for something that was using more bitrate than the SDR.

    Next, scroll down to the VUI section:

    1. First, make sure Range is Limited again. This may not be totally necessary as we set it before, but just in case it's a good idea.

    2. Color Primaries need to be BT2020, as that's what my Premiere Preset outputs the format as

    3. Similarly, Transfer Characteristics should be SMPTE 2084, to match the preset output

    4. Color Matrix should be BT2020nc. BT2020c may work as well, but I'm not 100% confident in that.

    5. Master Display. I recommend copying these settings first:

    G(8500,39850)B(6550,2300)R(35400,14600)WP(15635,16450)L(10000000,0)

    Don't use the default setting. That defaults to DCI-P3 primaries. What I've typed above are BT2020 primaries and a peak luminance of 1000 nits. This value is representative of the HDR display you used to edit with. If you didn't use an HDR display, or didn't make any color corrections even if you did use one, then what I would recommend is to set the L value to a range at or slightly above your "MaxCLL" value. For example, my MaxCLL value for my project was 1221 nits, so I decided to round up to 1500 nits for the mastering display, giving me L(15000000,0). The 0 part of that is the minimum luminance of the display. I typically leave this at zero, but again if you know the specs of your exact mastering display, you can include them here. Again, doing that is only really useful if you've performed color correction while viewing on an HDR display. If you choose to color correct, I would recommend placing a Lumetri filter before my preset, and checking the "HDR" box. You could also instead simply modify the second Lumetri filter included with my Preset (but DON'T click the HDR checkbox as that will remove the LUT). Doing it this way will treat shadow and highlight differently, but perhaps that may be more useful in some situations as well. Leave the LUT in place but you can use the other controls.

    6. Maximum Content Light Level. This is where you place the MaxCLL and MaxFALL values you obtained before. MaxCLL, followed by a comma, followed by MaxFALL.

    7. HDR options. Definitely make sure this is on, as it affects other encoder settings that tune for HDR

    8. UHD Blu-ray conform. This isn't 100% necessary, but I recommend it. It enforces other requirements that UHD Blu-ray has (not counting resolution and FPS) but this may improve compatibility with some devices so it's a good idea even if you don't intend to burn your video to UHD Blu-ray.

    Then just make sure your container and audio settings are to your liking (which settings you choose here may affect compatibility with your devices, or they may not)

    EDIT:

    Starting with Voukoder 2.3 RC2, you can now use NVENC's HEVC codec to encode in HDR as well following this guide. Make sure your HEVC output is in 10bit mode, and then go over to the filters tab and add "setparams" to the following:
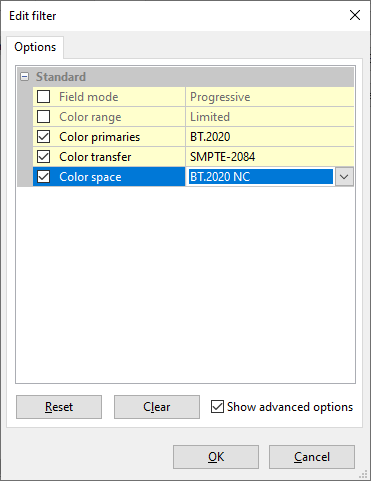

    The biggest issue is you won't be able to inject the stream with proper HDR10 metadata. So if you want a fully HDR10 compliant output, make sure you use x265, but for basic HDR support in HEVC through NVENC, this is now possible. Thank you, Vouk!

    EDIT 2:

    The above NVENC process works correctly for x264, VP9, and ProRes as well

    Okay it seems to be more complex right now...

    I will try zscale for performances issues.

    If zscale is an issue, skip it and set in x265 options: --transfer arib-std-b67

    along with the correct values for --colorprim and --colormatrix depending on your content

    Also, make sure premiere is importing your video unprocessed. Try opening it in avidemux and seeing if it looks the same there, since avidemux doesn't process HDR's transfer characteristics correctly. If avidemux doesn't work, MPC-HC can display the raw video if you go into MadVR settings, under devices, HDR, and set "pass through HDR to display"

    If premiere reads the color as bt2020, it's possible it might still force the editor to read it as HDR video, in which case HDR highlights will be clipped on any output with voukoder, and proper HDR won't be possible. I suspect that may happen with the way your video's mediainfo is set, but it might not since it's HLG instead of PQ. HLG is technically compatible with SDR output unprocessed, it's designed in a special way different than PQ that way. So if it's being read as unprocessed HLG, then it won't actually look too bad while editing, just a bit darker really. However, even if Premiere reads the transfer characteristics unprocessed, it may still process the color, which would be a problem for outputting in bt2020 correctly. For that, you may need zscale for converting bt709 color back to bt2020. It's just a lot of work to get this to work right, that's why I prefer to work in the raw unprocessed video (either encoded as raw, or incorrectly flagged as bt709)

    Ouch. Well the colorspace filter could still be useable. It could be placed in the filters section, or in its own tab like I suggested above. It just wouldn't have all options for trc. But since you included the options in x265, maybe that wouldn't be as much of an issue. I just know things would be limited for other encoders. At least for now.

    I would have to imagine something is wrong with zscale though. No way it should be that slow.

    I am thinking about removing these dropdown boxes again and just extend the regular zscale filter (Configure > Filters > Add filter (zscale) ) to support all the color space options. It'd be more consistent, I guess.

    That'd mean that there is also no need for the conversion checkbox, nor any mapping of option values. You can just add that filter if you need it.

    That could work. It's a little less obvious what to do if you're intending to encode HDR and don't know these steps though. I do like the idea of having total control under the zscale options, I just worry about the user friendliness of the HDR workflow. If you're intending to do a color space conversion, that approach is intuitive. If you're just intending to make sure those values are flagged correctly, that procedure isn't as obvious.

    Perhaps instead, color space should have its own tab under the video config window. If you do that, you could allow the user to optionally select input and/or output color space options, whichever they need. By default I would have all color space filters turned off / unchecked, and let the user only turn on the ones they need. Probably default to limited range and rec709 options, since most people won't be doing HDR (yet).

    Might also be a good idea to bring back the x265 settings in this case too. That way people would be able to find what they need either way, and it just makes the x265 page more complete/consistent as well.

    Okay, I think this would work. Let's say you wanted to set:

    Range: Limited

    Color Space: BT2020-NCL

    Transfer Characteristics: HLG

    Color Primaries: BT2020

    Convert input to output: No

    Then, if I'm understanding zscale correctly, the options would be:

    zscale=rin=limited:pin=2020:tin=arib-std-b67:min=2020_ncl

    but if you checked the convert box the options would then be:

    zscale=r=limited:p=2020:t=arib-std-b67:m=2020_ncl

    (unless I'm understanding that "convert" option backwards, then just swap them)

    I noticed the "tin" options on https://ffmpeg.org/ffmpeg-filters.html#Options-4 didn't match all of the available "t" options, but I'm guessing anything in one should work in the other. HLG and PQ are both supported there, so I think that should be good.

    It seems like a decent way to do it. It's probably a good idea to move those controls to voukoder instead of the premiere window anyway, so you can control them in other programs as easily. This solution would work for x265 (it would effectively do what 2.0.7 did with its HDR settings), but not necessarily for other encoders though if they don't have those individual options, so you may want to eventually consider that "Override Input Color Space" idea for the video filters section. Even if just for the case of having additional control over the conversions happening. Heck, you could even use that to do some funky color effects lol

    I think about adding 3 dropdown boxes to voukoder. The most common values will be preselected. Reason for this that these values are independent from premiere and need also to be set when using an other NLE (i.e. VEGAS)

    Filters will only be applied when the frame data from the NLE differs to the output setting.

    Examples:

    • premiere delivers rec709 limited - output is set to rec709 limited -> No Conversion
    • premiere delivers rec601 limited - output is set to rec2020 something -> Conversion

    Due to the fact that premiere will never deliver rec2020 there will be always a conversion. There needs to be a ruleset defined.

    The issue here is that if you want to be able to output HDR correctly in premiere, then premiere must interpret it as rec709. I really don't think there's a reason for conversion. If you use the ispace, itrc, iprimaries filters then you're defining what the input space is, which is what the main reason for using those options should be. If the user wants to do a conversion, then that should be a separate option on the video filters section of voukoder.

    Perhaps as a compromise, maybe you could keep it the way it is (plus the other two drop downs when bt2020 options are selected) but add "Override Input Color Space" to the video filters section, where the user can override those values for the input, in case something in the NLE is sending the data incorrectly. Also, I would recommend requesting the rec709-based input for anything that isn't rec601 selected.

    Premiere just has a particularly weird way of handling HDR when HDR is flagged correctly. It will never work with voukoder as it is, because it will be sending data in an unclipped rec709 format. Like, there will be values "brighter than white" and the only way to process it correctly would be to perform a manual mathematical conversion from THAT source, into the correctly selected transfer function. Furthermore, I'm pretty sure Adobe is clipping black in this mode as well. It's just a mess on that end and simply won't be sending the data in the way x265 expects, and it will likely stay that way for a while.

    It's certainly possible for there to be weird combos, like I've seen 4K Blu-rays with DCI-P3 primaries, even though they all use rec2020 color space. It's also technically possible to use rec709-based trc with rec2020 colors, but this is rare. This would be for example, an SDR video with Wide Color Gamut. And then you also have HLG, which uses the ARIB STD-B67 trc. Some broadcast providers use this format, as well as Wickyed's camera, apparently.

    Maybe what I would suggest is leave the drop down as it is when the user first opens the Premiere Export page, but once they select bt2020nc or bt2020c, then two additional dropdowns appear for transfer fuction and primaries, with st2084 and bt2020 as defaults. I think most people dealing with bt2020 color will have some familiarity with those concepts, but they most likely won't be necessary for rec709 or rec601 formatted videos.

    If you do this, the x265 options for those may not be necessary, but only if you can ensure that no color space conversion is happening. I fear those filters above will still cause a conversion. Changing them to ispace/itrc/iprimaries may fix that. If not, keep the x265 options as a failsafe. I believe that the options on x265 will simply re-interpret what ffmpeg passes to it, without any further conversion. If ffmpeg's filters are doing a conversion, then x265's options won't undo that. They will simply assume the already-converted colors are in the space you specify.

    Also, in the above code, bt2020nc and bt2020c are handled the same. Might want to fix that.

    First some questions:

    1. Did this work with version 2.2 properly?

    2. Can you please take a look in your log file (%LOCALAPPDATA%\Voukoder) and tell me the pixel format that is mentioned next to:

    "Requesting pixel format:"

    [03:52:20] Requesting pixel format: yuv420p10le

    [03:52:21] Applying video filters: colorspace=range=mpeg:space=bt2020ncl:trc=bt2020-10:primaries=bt2020,format=pix_fmts=yuv420p10le

    I wonder if that's the problem right there, the video filters. Those are most likely performing conversions. You shouldn't need those. Just set the correct options in x265, as described above. Or, perhaps you should be using ispace, itrc, and iprimaries instead maybe?

    Most likely ffmpeg is assuming bt709 as the input color space, so when you tell it what the output color space should be, it feels the need to do a conversion, causing this issue. That being said, it's not performing a conversion on transfer characteristics, so I'm not entirely sure. But maybe that part's because of the yuv420p10le format.

    2.2 doesn't save any of my advanced x265 settings, so I can't exactly encode HDR properly, but outputting with bt2020 settings in the main Premiere window does in fact cause the same color shift.

    ----

    In the meantime I've found using a rec2020 to rec709 conversion LUT, applied in Lumetri Color is a workaround to this issue, but of course this limits the color gamut to SDR color, so it's not ideal.